
Practical way of understanding OSI model and its layers
The Tale:
In the early beginning of the internet, it was impossible for devices from different vendors to communicate with each other, back in the 1970s a framework was introduced in the networking industry to solve the problem “ The OSI MODEL”
nowadays we can work in a multi-vendor environment with fewer difficulties.
The OSI Model is subdivided into 7 layers:
- Application
- Presentation
- Session
- Transport
- Network
- Data link
- Physical
During the networking journey, most network apprentices memorize the 7 layers using some mnemonic to learn the framework better and there are more fun mnemonics in different networking communities one of the better known is “ P lease D o N ot T hrow S ausage P izza A way”.
The OSI model seems logical and more abstract to learn, you can read tons of books around the framework, more mnemonics, and cheat sheets. Does it make you a great network engineer?
In the industry, we face different challenges, as soon as networks become complex to manage there are more network outages worldwide. Learning the OSI model we discover more things like Packets, Frames, and Bits,…
Imagine you have a breakdown at work or home with your Lan, as an OSI model genius how to troubleshoot or analyze the network referring to the 7 layers?
The Path:
The answer is “ Wireshark”, the most advanced packet sniffer in the world.
It’s an application, network analyzer that captures network packets from a network, such as from Lan, Wlan and there are endless possibilities to explore with the tool.

In my demo I am configuring 2 routers Running Cisco IOS, the main goal is to show you how we can see the 7 OSI model layers in action, Sending a ping between the 2 devices.
| Routers hostname | IP address |
|---|---|
| Prod | 192.168.1.1/24 |
| Sandbox | 192.168.1.10/24 |
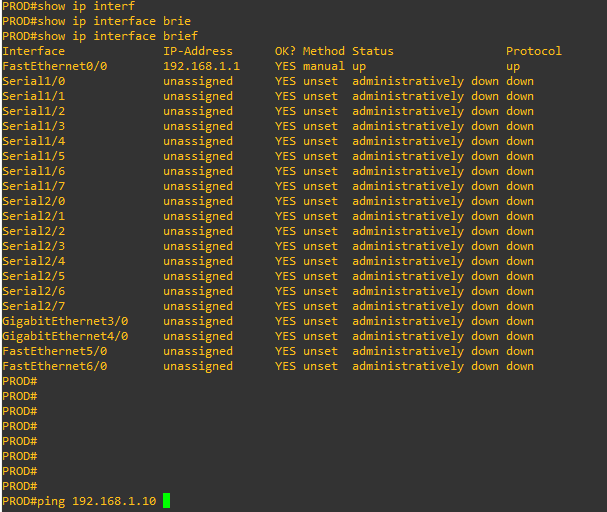
in the prod router, I send a ping to 192.168.1.10 the Sandbox router.
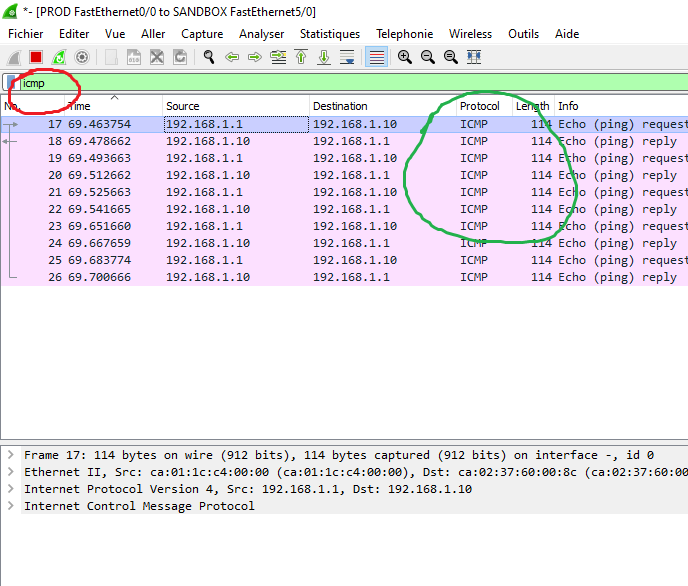
if the ping is successful to the Sandbox router we will see !!!!! (The exclamation mark),for network engineers, happiness is when they see it !!!!!

After sending the ping, if we observe the Wireshark traffic carefully

we see the source IP address: 192.168.1.1/24
and the destination address : is 192.168.1.10/24
ICMP is the protocol used by the Ping utility and there are some other protocols running when the 2 devices exchange information.
For our short demo, in Wireshark we filter “ ICMP” and “ Telne t” to analyze the traffic

Let’s break down the OSI model! after memorizing different mnemonics will you be able to discover the layers with the sniffer?

Let us deep dive into each layer and investigate packet
Dissecting an Ethernet Frame
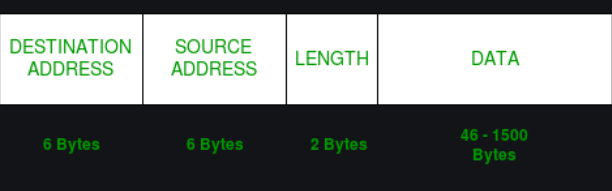
** As the wireshark won’t capture FCS it is omitted here
Wireshark captures the Ethernet frame

- Destination - The Destination field contains the MAC address of the device that the Ethernet frame is being sent to.
- Source - The Source field contains the MAC address of the device that sent the Ethernet frame
- Type -The Type field indicates the type of protocol being carried in the payload of the Ethernet frame. For example, if the Type field is set to 0x0800, it means that the payload contains an IPv4 packet. Other common values for the Type field include 0x0806 for ARP packets and 0x86DD for IPv6 packets.
*** Note that the values in the Type field are typically represented in hexadecimal format***
Dissecting an IP packet
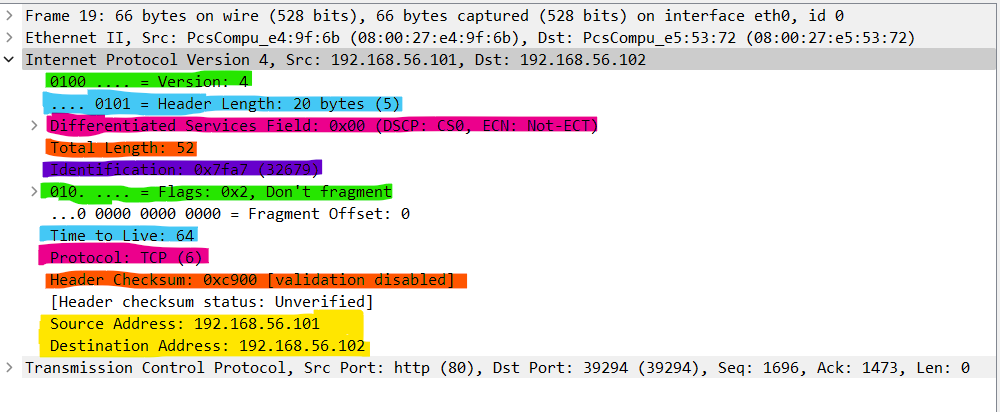
- Version - gives you the internet protocol version as its name suggests
- Header length - length of the IP header only
- Differentiated services field - In this field, prioritization tags can be given for any important packets or traffic
- Total length - packet length, including the header and payload
- Identification - unique IP ID to track the packet
- Flags - bits can be set for fragmentation of the packet
- Time to live - Number of hop counts remained for the packet till it gets blackholed to avoid loops
- Protocol - Specifies layer 5 protocol
- Header checksum - Checksum to have a reliable transfer of the bits
- Source and Destination IP addresses as names suggested
Dissecting TCP Segment

- Source and destination port - used to identify the sending and receiving applications
- Sequence number - a unique number to identify the order in it is intended to be received
- Acknowledgment number - acknowledge the receipt of data from the other side
- Flags - To control various aspects of the connection, URG (urgent data pointer field is valid), ACK (acknowledgment field is valid), PSH (push function), RST (reset connection), SYN (synchronize sequence numbers), and FIN (no more data from sender).
- Window size - the amount of data that the sender is willing to receive before it expects an acknowledgment.
- Checksum - used to ensure that the TCP segment has been transmitted without errors.
- Urgent Pointer - This field is used to indicate the end of urgent data.
- Options - TCP options can be included in the header to provide additional information about the connection. Common TCP options include Maximum Segment Size (MSS), Window Scaling, and Selective Acknowledgment (SACK) options.
The Challenge:
It is simple, Fire up your Wireshark and dissect the traffic in your network and analyze all the fields at layers 2,3 and 4.
Thank you for reading. More articles Coming soon!
Follow us on tales of technology for more such articles.
our twitter profile - toftechnology
Our Linkedin profile to follow
please comment below for any queries or feedback